
A DPI converter solves a problem that shows up at the worst possible time. A print shop asks for 300 DPI. An exam portal wants a specific value. Your file says 72, and you have no idea how to fix it.
Changing DPI is usually a two-second job, because DPI is just a number stored inside your file. Understanding what that number does saves you from a badly printed poster later. This online DPI converter lets you change image DPI to 72, 96, 150, 200, 300 or 600.
You can also type your own value. It works as a 150 DPI converter, a 200 DPI converter and a DPI 300 converter in one tool. By default it rewrites only the DPI tag, so your pixels stay exactly as they are.
DPI Converter
Change your image DPI to 300, 200, 150 or any custom value. Set an exact print size and compress under a KB limit. Everything happens inside your browser. No uploads. 100% private.
Drag & drop images here
or click to browse — you can also paste an image with Ctrl/Cmd + V
Supports JPG, JPEG, PNG, WEBP · Max 25MB per file
Selected Images 0
DPI Settings
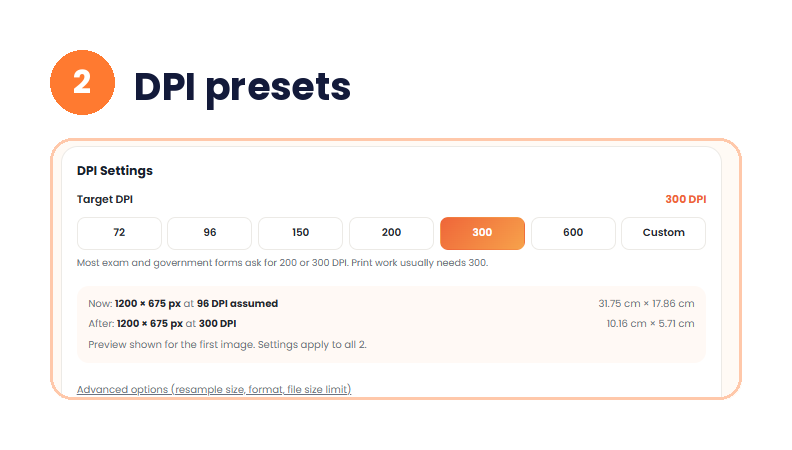
Most exam and government forms ask for 200 or 300 DPI. Print work usually needs 300.
Leave blank to keep the current print size and simply resample at the new DPI.
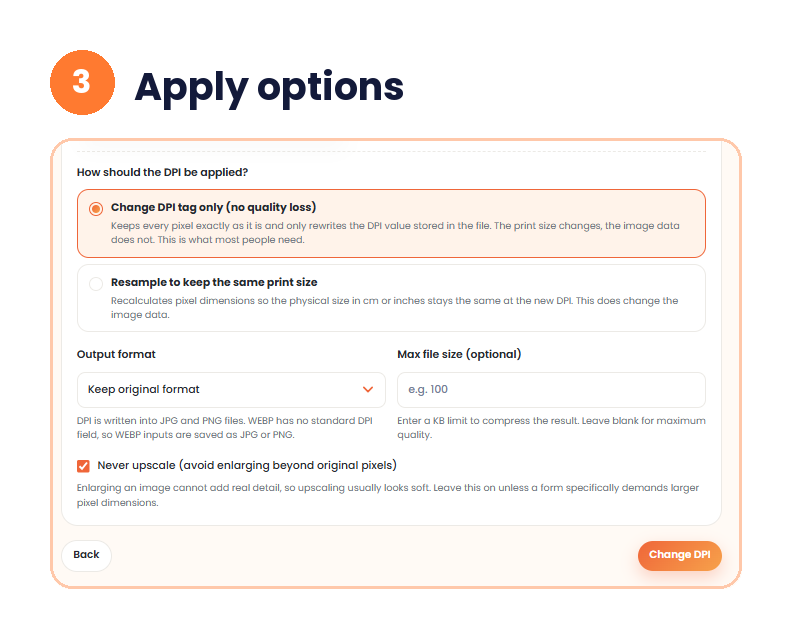
DPI is written into JPG and PNG files. WEBP has no standard DPI field, so WEBP inputs are saved as JPG or PNG.
Enter a KB limit to compress the result. Leave blank for maximum quality.
Enlarging an image cannot add real detail, so upscaling usually looks soft. Leave this on unless a form specifically demands larger pixel dimensions.
Converting…
Results
What DPI Actually Is?
DPI stands for dots per inch. It tells a printer how densely to lay down ink across a page. A photo at 300 DPI packs 300 dots into every inch of paper. At 72 DPI, that same inch holds far fewer dots, so the print looks softer.
Now the part that trips people up. In a digital file, DPI is metadata. It is a label stored in the file header, not a description of the pixels inside. Your image might be 1200 by 1800 pixels whether the header says 72 or 600.
Some DPI converter tools claim that bumping an image to 600 DPI improves its quality. That is not how it works. You cannot create detail that was never captured. You are only telling the printer how to space out the pixels you already have.
DPI vs PPI: Convert Pixels Per Inch to DPI
You will also see the term pixels per inch, or PPI. PPI describes how many pixels fit in one inch of a screen or print. DPI describes how many ink dots a printer lays down per inch.
For a digital image file, people use the two terms for the same number. If you convert pixels per inch to DPI, the value stays the same. A file tagged 300 PPI and a file tagged 300 DPI hold the same setting. Forms and print shops almost always say DPI, so set DPI.
What Does 200 DPI Mean?
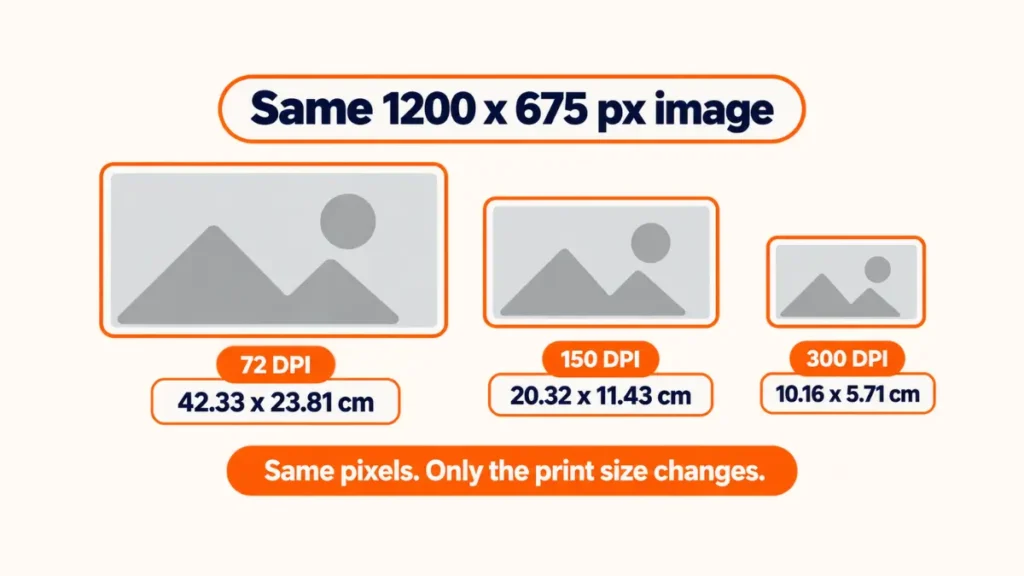
A setting of 200 DPI means the file tells a printer to print 200 pixels in every inch. The print size follows a simple formula. Print size in inches equals pixels divided by DPI. Multiply by 2.54 to get centimeters.
Take the 1200 × 675 px image I used for testing. The same pixels give a different print size at each setting.
| DPI | Print width | Print height |
|---|---|---|
| 72 | 42.33 cm | 23.81 cm |
| 96 | 31.75 cm | 17.86 cm |
| 150 | 20.32 cm | 11.43 cm |
| 200 | 15.24 cm | 8.57 cm |
| 300 | 10.16 cm | 5.71 cm |
| 600 | 5.08 cm | 2.86 cm |
Higher DPI makes the printed picture smaller, not sharper. The pixel count never changes. So a form that asks for 200 DPI is asking for a pixel density. It often wants a certain size too.
Changing the Label vs Resampling the Image
There are two different operations people mean when they talk about a DPI change.
The first just rewrites the metadata. Your pixels stay untouched, the file size barely moves, and the printer now reads a different instruction. This is what you want in almost every case, especially when a portal or print shop specifies a number. The tool calls it Change DPI tag only (no quality loss).
The second is resampling. The tool adds or removes pixels so the physical print size stays the same at the new DPI. Going down is safe enough, since you are discarding data. Going up is where people get disappointed, because software is guessing at detail that was never there. An upscaled image often looks soft or slightly smeared.
A good DPI changer should make clear which one it is doing. If a tool promises better quality just from a higher number, treat that as a warning sign. The best tools state plainly whether they touch your pixels or just the label.
Which DPI You Actually Need
| Use case | Recommended DPI |
|---|---|
| Web images, screens | 72 |
| Windows display standard | 96 |
| Posters, flyers, small prints | 150 to 200 |
| Standard photo printing | 300 |
| High quality or large format | 600 |
Most print services settle on 300 as their default request. Go higher only when the job genuinely calls for it, like exhibition work or something viewed up close. The tool itself says most exam and government forms ask for 200 or 300 DPI. Print work usually needs 300.
How to Change DPI of an Image Online in 4 Steps
The process takes about ten seconds once your file is ready.
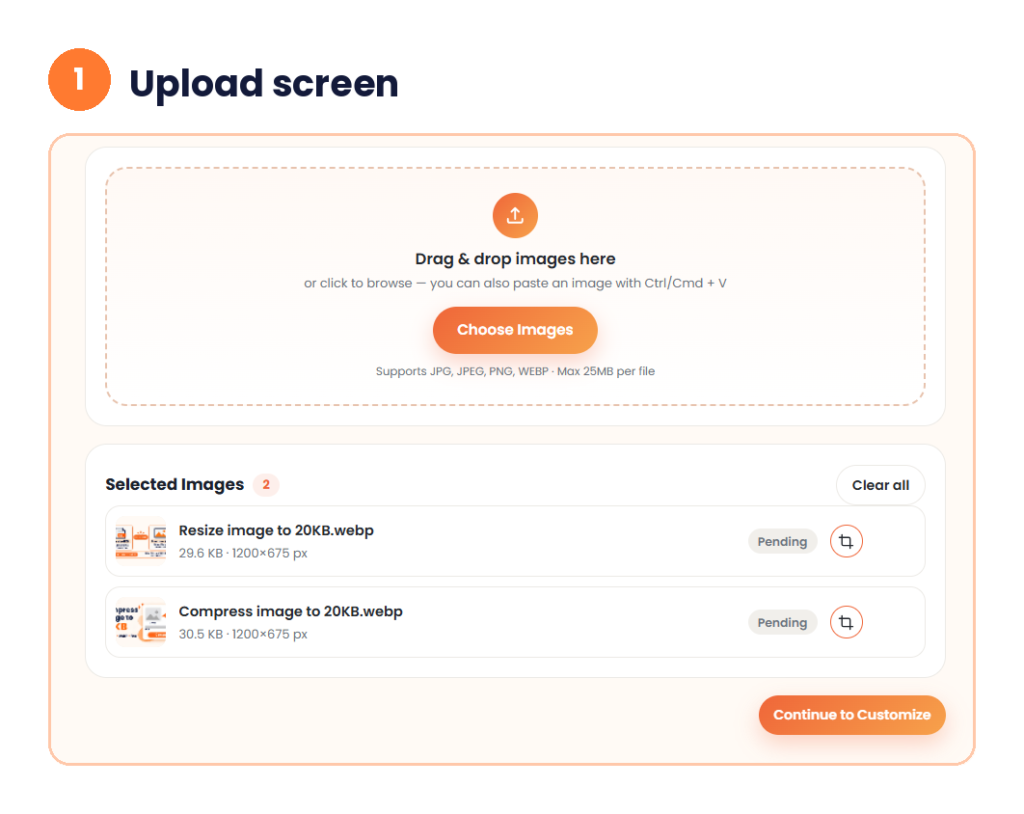
Step 1: Upload your images
Drag your files into the box, or click Choose Images. You can also paste an image with Ctrl or Cmd + V. The tool takes JPG, JPEG, PNG and WEBP files up to 25 MB each. Add several at once if you need the same setting for all of them. Each file has a crop icon if you want to trim it first. Then click Continue to Customize.
Step 2: Pick your target DPI
Choose 72, 96, 150, 200, 300 or 600. To convert an image to 200 DPI, tap 200. A DPI 300 converter preset is the one most people reach for, since print shops ask for it constantly. Need 100 DPI or another odd value? Choose Custom and type it. A box under the presets shows your image now and after the change. It lists the pixels, the DPI and the print size in centimeters.
Step 3: Choose how DPI is applied
Keep Change DPI tag only unless you have a reason to resample. It keeps every pixel as it is. Pick Resample to keep the same print size when a form wants a set size in cm or inches. Leave Never upscale ticked, so the tool never enlarges beyond your original pixels. Under Advanced options you can also set the output format and a max file size in KB. Then click Change DPI.
Step 4: Download and check
Each result card shows the DPI, the size in KB, the format, the pixels and the print size. A green badge says “pixels untouched” when you used the tag-only mode. Click Download for one file, or Download All (ZIP) for several.
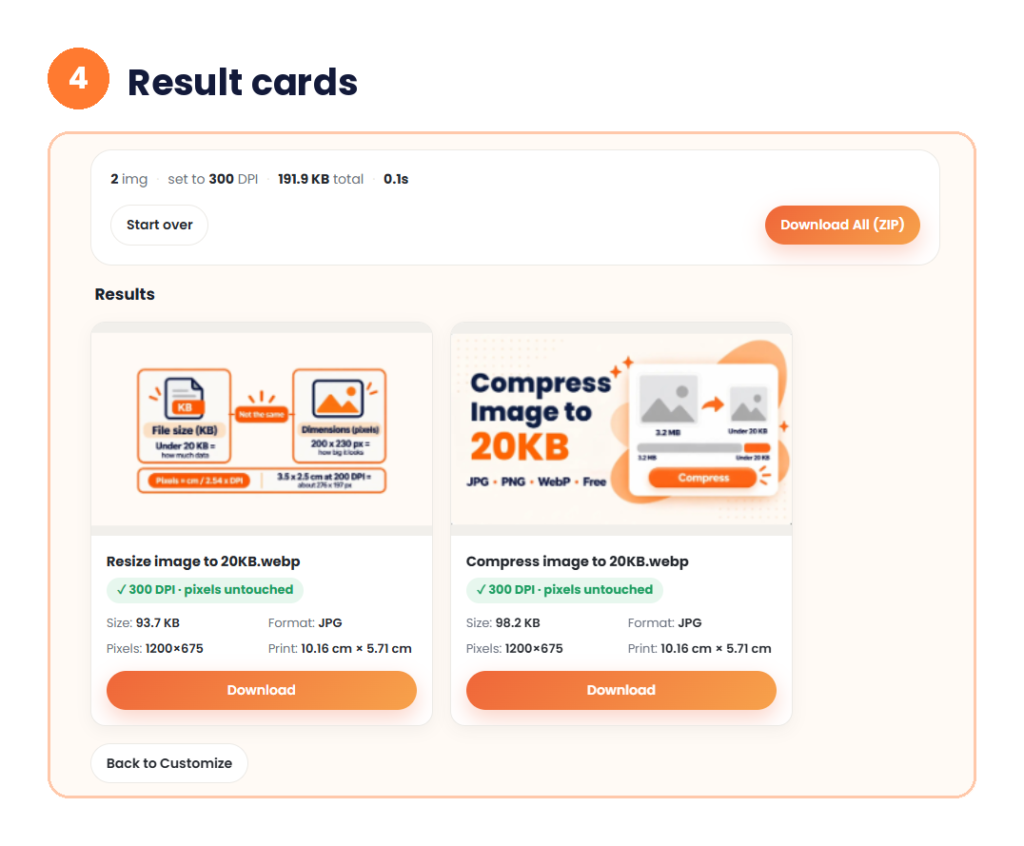
You can change DPI of image files one by one, or run a whole set at the same value. Either way, the steps stay the same. Some tools cap you at a few images per run, which gets tedious fast when you are preparing a set. Check the limit on the tool you use.
My Test: Changing Two Images to 300 DPI
I tested the tool with two WebP files, 29.6 KB and 30.5 KB, both 1200 × 675 pixels. I picked 300 DPI and kept the tag-only mode.
The Now / After box showed the image at 96 DPI assumed, which is 31.75 × 17.86 cm. After the change it showed 300 DPI, which is 10.16 × 5.71 cm. The tool finished both files in 0.1 seconds and showed “pixels untouched.”
The files came out as JPG at 93.7 KB and 98.2 KB, 191.9 KB in total. That size jump has nothing to do with DPI. WebP has no standard DPI field, so the tool saved the images as JPG. If the file size matters, start with a JPG or PNG. Then the tool keeps your format.
Change DPI Without Losing Quality
Many people want to increase DPI of image files, hoping for a sharper result. A DPI converter that only changes the tag cannot do that. It changes the print size and leaves the quality alone. If you resample upward, the software invents pixels, and the picture can look soft.
That is why the tool has the Never upscale option. It stays on by default. Turn it off only when a form demands larger pixel dimensions. In that case, start with the largest original you have.
150, 200 and 300 DPI: Examples From Real Forms
Rules differ by portal. These are examples, so check your own notice.
| Source | Item | What it asks for |
|---|---|---|
| ICAI exam site | Signature | 50 KB or less, scanned at 200 DPI |
| A finance guide on PAN cards | PAN photo | 3.5 × 2.5 cm at 200 DPI, 20 KB or less |
| Common passport photo guides | 35 × 45 mm photo | 413 × 531 px at 300 DPI |
The same 35 × 45 mm photo needs different pixels at each DPI. It is 207 × 266 px at 150 DPI and 276 × 354 px at 200 DPI. At 300 DPI it is 413 × 531 px. Use the formula pixels equal millimeters divided by 25.4, multiplied by DPI.
If your form also sets a KB limit, use the max file size option in Step 3. Our MB to KB converter explains the units, and the Compress image to 20KB shrinks files further. For photos, our passport size photo maker handles the crop first.
How to Check Your DPI Afterward
This is where a lot of people get confused, and it is worth getting right.
MS Paint is not a reliable way to verify DPI. It often shows 96 DPI no matter what you converted to. Do not trust it.
On Windows, right-click the file in Explorer and choose Properties. Open the Details tab and look for Horizontal resolution. That is your real value. On Mac, open the file in Preview and choose Tools, then Adjust Size. The Resolution field shows the stored value.
Checking takes five seconds and beats finding out at the print counter.
Why Local Processing Matters Here
Many online converters upload your file to their server, process it, then delete it after a set window. That is fine for a stock photo. It is less fine for a scanned document, an ID photo, or client work under an agreement.
A tool that runs in your browser never uploads the file. Your image stays on your device, and nothing sits on a server waiting to be deleted. There is a speed benefit too. No upload, no queue, no download round trip. A tag change finishes in a fraction of a second.
Common Mistakes Worth Avoiding
Raising DPI on a small image is the big one. A 400 by 400 photo does not become print-ready because the header says 600. Check your pixel dimensions first, then set DPI to match.
Resampling upward when you did not need to is another. If a form just wants a specific DPI value, change the tag and leave the pixels alone. Resampling is for when the physical print size genuinely needs to stay fixed.
Trusting Paint or a preview thumbnail catches people out constantly. Verify with the steps above. Finally, do not assume every form wants 300. Some want 200, some specify 600, and a few care about pixel dimensions instead. Read the actual requirement.
What Makes a Good DPI Tool
A useful DPI resizer keeps the basics straightforward. Presets for common values, a custom field for odd requests, and support for the formats you actually use. A DPI resizer that hides which operation it is running is not worth your time.
Batch handling matters if you work in volume. So does an honest interface that does not oversell what a tag change can do. And free should mean free, with no watermark and no account wall.
Quick Answers Before You Start
Does increasing DPI improve image quality?
No, not on its own. DPI is metadata, so raising it does not add detail that was never captured.
What DPI should I use for printing?
300 covers most standard printing. Go to 600 for large format or high-end work.
What does 200 DPI mean?
It means 200 pixels print in each inch. A 1200 px wide image prints about 6 inches wide at 200 DPI.
Is DPI the same as PPI?
For image files, people use them for the same value. Set the number your form calls DPI.
How do I change DPI without losing quality?
Pick Change DPI tag only. It rewrites the label and leaves every pixel alone.
Why did my file size change after I set the DPI?
Check the output format. WebP has no DPI field, so the tool saves it as JPG or PNG, and the size can grow.
Conclusion
Most DPI problems come down to one misunderstanding about the DPI converter’s job. The number in your file header tells a printer what to do. It does not change the pixels you already have.
Get your pixel dimensions right first. Then set the DPI your print shop or form asks for, verify it properly, and you are done. A free DPI converter handles that part in seconds, and an online DPI change needs no software.